Most players roll a Priest expecting to heal their way to 60 and suffer through every level doing it. Classic Priest leveling gets misread as a damage problem when it’s a mana problem.
Ignore the wand for half a zone, and the whole session quietly unravels. I’ve done it more than once before the pattern finally clicked.
Spirit Tap, Wand Specialization, and the kill sequence all work together. None of it requires perfect execution. It just requires understanding why the order matters before you start.
Here you’ll find everything needed to run an efficient Priest from level 1 to 60.
What Makes Priest Leveling Different From Every Other Class?
Priest leveling is fundamentally a mana game, not a damage race.
I figured that out after spending my first ten levels constantly casting, running dry, and sitting down more than I actually played.
Every other class tries to kill faster. Priest wins by recovering faster and sitting down less between pulls. That shift in thinking changed everything for me.
Warlocks solve the same mana puzzle differently, leaning on Life Tap and a pet instead of a wand, and it’s worth comparing notes in our Warlock leveling guide if you’re still deciding between the two.
The tools are already there. Spirit Tap refills your mana after every kill. Wand Specialization lets your wand finish mobs without touching your mana bar at all.
Spirit and Intellect do the heavy lifting on stats. Spirit feeds your regen rate. Intellect keeps your pool deep enough to get through a pull cleanly.
When I ignored the wand and kept casting, I was dry every three pulls. That comes down to playing against the class instead of with it.
Everything in this guide flows from that one idea: mana efficiency is the engine. Talents, gear, and rotation all exist to protect and feed that system.
Race Selection: What Actually Matters at Each Stage of Leveling?
Race won’t make or break your leveling run, but it does affect how smoothly the mana system holds up. I’d pick based on what the racial actually does between levels 1 and 60, not what looks good on a tier list.
Alliance Options
Human is the underrated pick for leveling. Cloth wearers get extra value from our WoW Classic tailoring guide.
The bonus Spirit compounds quietly across hundreds of pulls. Faster regen between kills means less sitting, and less sitting means faster zones.
I see a lot of players lock in Dwarf for Fear Ward without thinking about when they’ll actually use it. Fear Ward is a raid tool, not a leveling tool.
Stoneform is where Dwarf earns its keep while leveling. It removes bleeds, poisons, and diseases mid-fight. That’s genuinely useful against specific mob types in mid-level zones.
So the real Dwarf vs. Human question is this: do you want PvP survivability or passive mana regen? For a PvE server, Human pulls ahead for the leveling window specifically.
Horde Options
Undead is the default Horde pick, and Will of the Forsaken is the reason. Breaking fear, charm, or sleep mid-fight is constantly important. On a PvP server, it becomes even more valuable.
Every Priest also gets Devouring Plague once you’re deep enough into Shadow, and it adds a solid damage-over-time effect that fits the kill sequence naturally.
It does cost mana, so I’d use it selectively rather than every pull.
Troll is worth considering if you like Berserking. The cast speed burst pairs well with Mind Blast timing, but it’s situational rather than consistent across a full leveling session.
Other Horde races don’t bring much that moves the needle for Priest specifically. Undead covers the most ground for the widest range of server types.
The Kill Sequence: How the Mana Economy Actually Works?
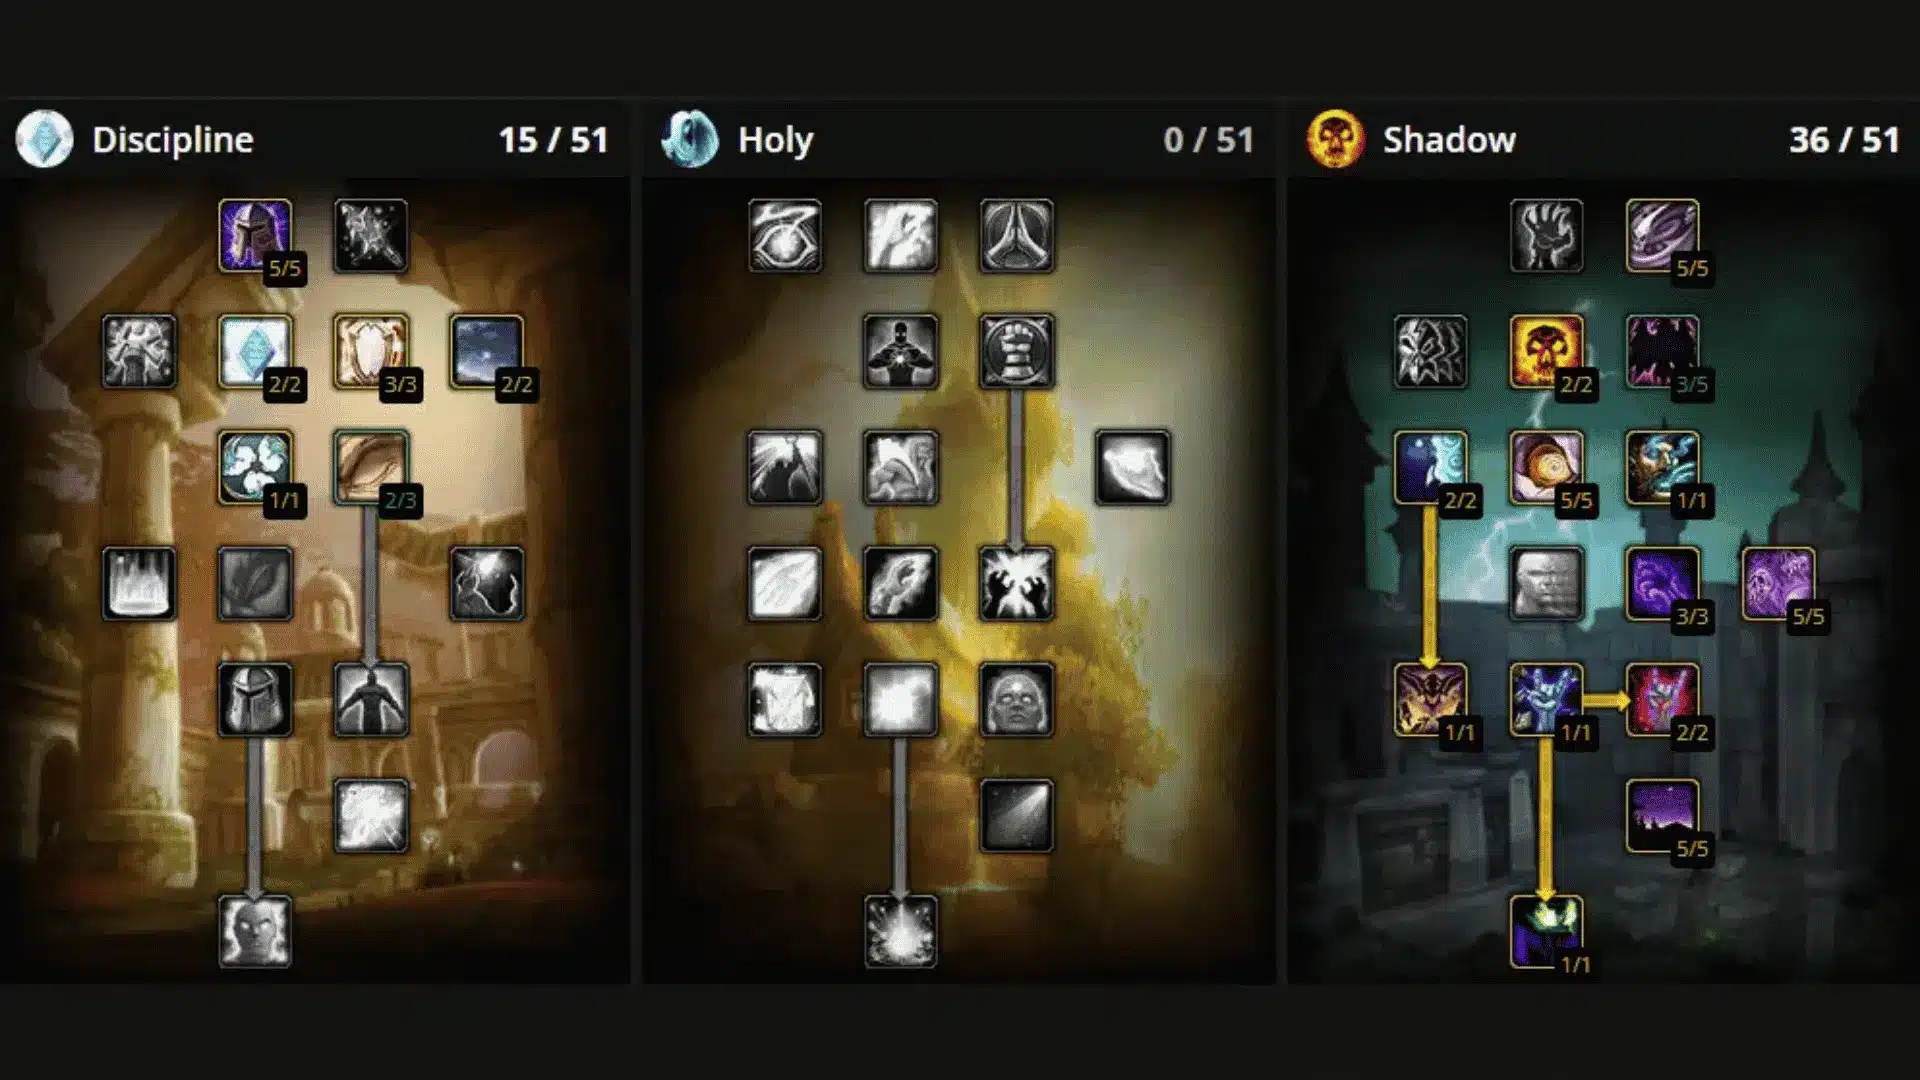
The standard leveling sequence is: Power Word: Shield → Shadow Word: Pain → Mind Blast → Wand to Finish. Every decision in that order exists to protect your mana bar and guarantee a Spirit Tap proc.
Shadow is the spec that makes this work. We’ll cover the full talent path later, but the sequence is where it all comes together.
The Sequence Step-by-Step
Use this order to keep each pull smooth, safe, and mana efficient.
- Start with Shield: Cast Power Word: Shield first so enemy hits do not interrupt your early spells.
- Apply Shadow Word: Pain: Use one cast so the damage keeps ticking while you move into wanding.
- Cast Mind Blast once: Use one hard hit to lower the mob enough for your wand to finish the pull.
- Avoid a second Mind Blast: The extra mana cost is not worth it during normal leveling pulls.
- Finish with your wand: Let wand damage close out the kill without spending more mana.
- Secure the killing blow: The sequence works because the mob dies to you while your mana stays stable.
- Check your wand often: If the rotation feels slow but downtime is low, your wand may be outdated.
Spirit Tap: Why the Killing Blow Matters?
Spirit Tap gives you 100% of your Spirit as bonus Spirit for 15 seconds, but only if you land the killing blow. That condition is everything.
At low levels, mob health varies enough that a Shadow Word: Pain tick or a stray Mind Blast can kill the mob before your wand gets there. When that happens, the proc doesn’t fire, and you sit down to regen instead.
The wand is the only reliable way to control that killing blow. Every swing exists to own the final hit, not to add damage.
Once the mob drops, loot it and start walking to the next target.
That 15-second window is still running. It stacks on top of your normal out-of-combat regen, which is why the downtime disappears almost completely when the sequence is clean.
I used to cast one more spell after Mind Blast to “speed things up”. All it did was steal the killing blow from my wand and cut my regen window in half.
When Does the Sequence Break down?
The sequence only works if your wand stays current. Once it falls eight or more levels behind, mobs stop dying cleanly to wand damage.
That forces an extra spell to finish the pull, which costs mana and may take the killing blow. If that happens, Spirit Tap will not proc, and your downtime starts stacking fast.
The fix is simple: treat wand upgrades as mandatory. As long as your wand can finish pulls, the whole leveling rhythm stays intact.
Talent Progression: Every Point from Level 10 to 60
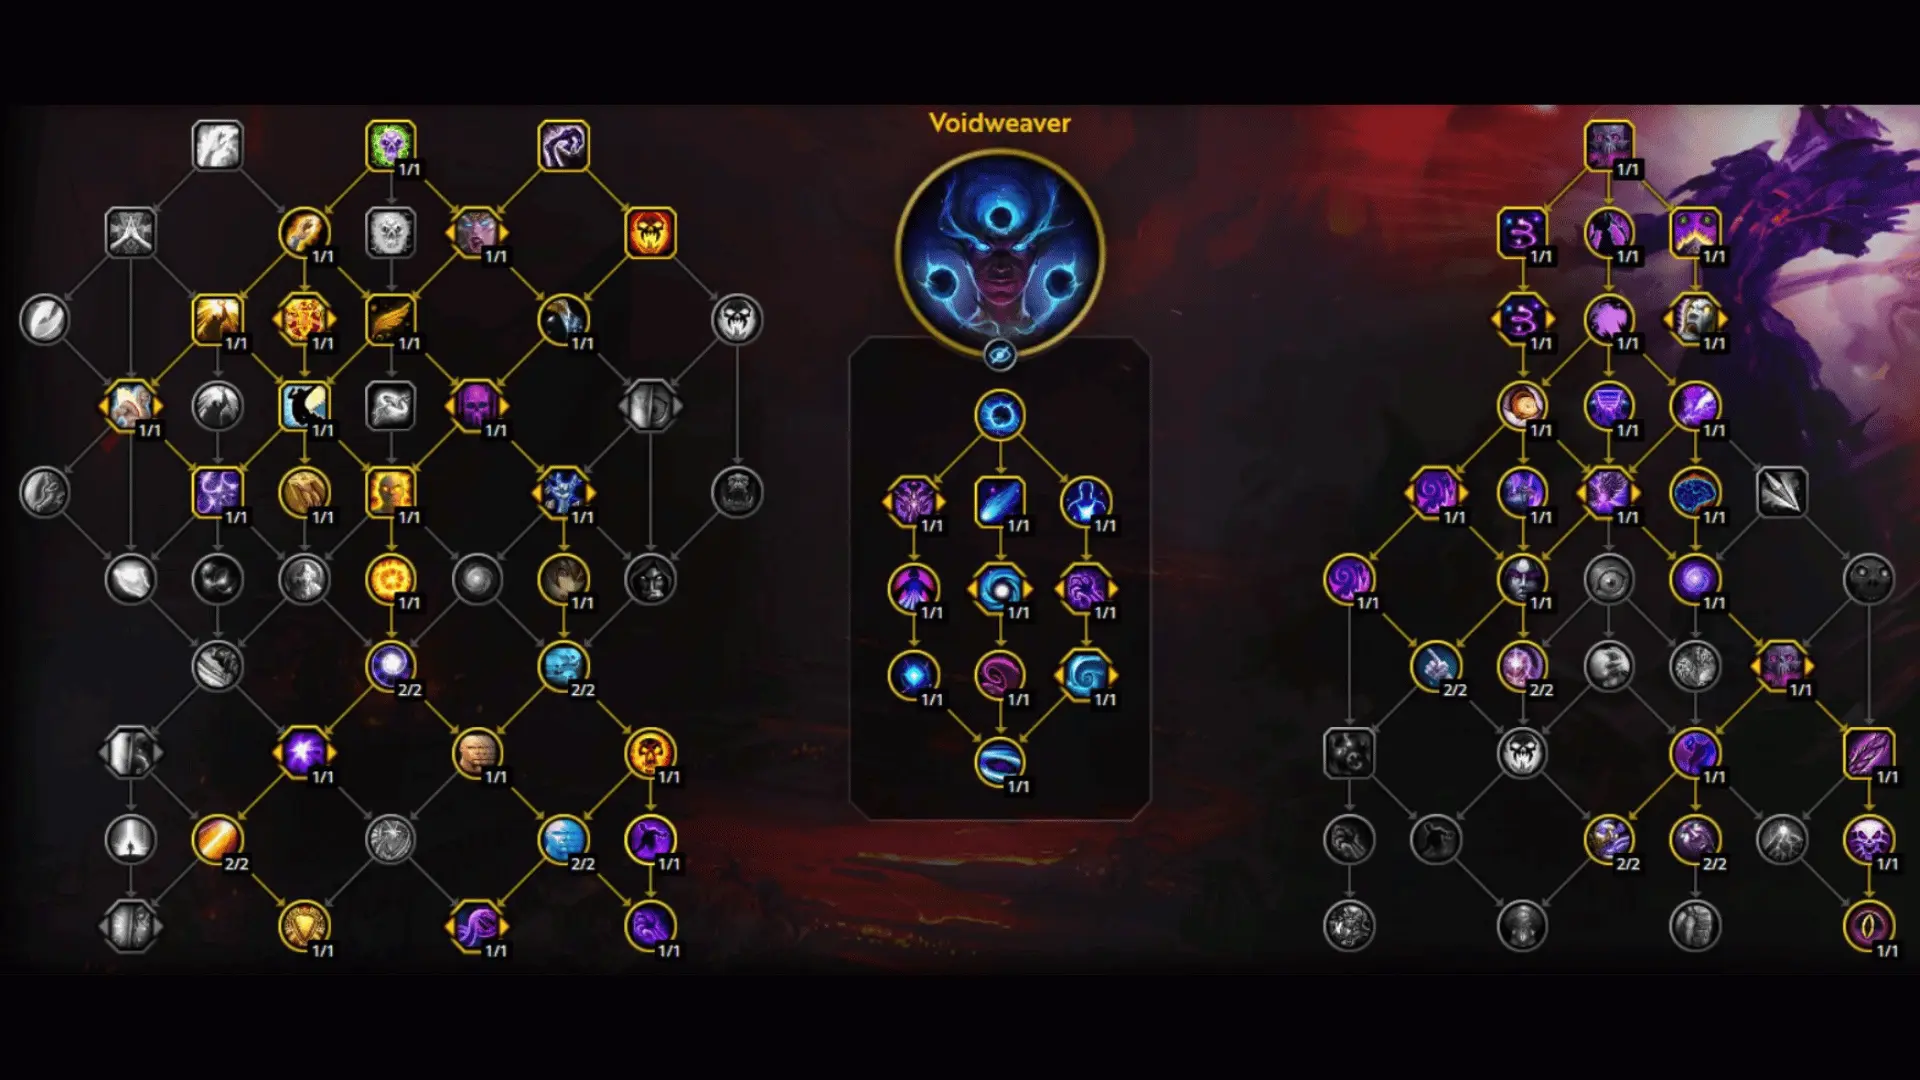
The optimal path runs Discipline through level 19, then moves into Shadow and stays there until 60. I’ve tried deviating from it. It never paid off. Every point exists to protect the kill sequence.
These bands build on each other. Getting one wrong makes the next one harder to work with.
Levels 10–19: Spirit Tap and Wand Foundation
Start here and don’t second-guess it. I wasted two points early on and felt it for the next five levels. These two talents are the entire foundation.
- Spirit Tap 5/5: Every killing blow fires a regen proc. More procs mean less sitting, and less sitting means faster leveling throughout the session.
- Wand Specialization 5/5: Adds 25% wand damage. Keeps the wand strong enough to land the killing blow cleanly as mob health scales up.
I put a point into Holy at level 12, thinking it would help with survivability. It did nothing useful solo. Holy only earns its keep when you’re actively healing a group.
If your downtime is under 10 seconds per pull at level 19, you’re on track.
Levels 20–39: Entering the Shadow Tree
Move into Shadow at 20 and stay there. I kept second-guessing this range early on, but the picks here are more straightforward than they look.
- Shadow Focus: Reduces the Shadow spell miss chance. Mind Blast needs to land every pull. A miss costs mana and quietly breaks the sequence timing.
- Blackout: Low impact but taken on the way through. Even a point or two gives a small stun chance that occasionally buys a free wand swing without spending anything.
- Improved Shadow Word: Pain: I skipped this for solo leveling and never noticed the gap. Most open-world mobs die before the extra ticks fire. Take it for dungeons, skip it solo.
Mind Flay unlocks at 20, and it took me a while to use it correctly. It’s not a wand replacement. It’s a tool for specific situations where the wand underperforms.
High-armor mobs and moments where I needed to slow something and reset position. That’s where Mind Flay earned its place. Everything else, the wand stays in rotation and finishes the job.
If downtime stays under 10 seconds per pull through the 30s, the Shadow foundation is working.
Levels 40–60: Shadowform and Shadow Completion
Shadowform was the moment leveling finally felt fast. Kills tightened up, incoming physical damage dropped, and the sequence that had been building since level 10 had real damage behind it.
- 15% Shadow damage increase: Every spell and every tick hits harder from here forward. The whole kill sequence gets a quiet upgrade without changing a single step.
- Physical damage reduction: I noticed this more than I expected. Chaining pulls without stopping became much easier once Shadowform was active.
Every point from 40 onward finishes the Shadow tree. I didn’t face a single meaningful decision here. The path runs straight, and the returns stay consistent at 60.
If your talent order matches this and downtime stays in the low 50s, you’re executing the full path correctly.
Gear and Wand Progression: The Upgrade Path That Keeps the Kill Sequence Working
Most gear mistakes I made while leveling traced back to one thing: ignoring the wand too long. When it falls behind, mobs stop dying cleanly, and Spirit Tap stops proccing.
It compounds faster than you’d expect. By the time you feel it, you’re already two zones behind on momentum.
The Wand Upgrade Ladder
Your first wand purchase is the most important gold you’ll spend before level 20. Treat every upgrade after it as mandatory maintenance, not optional gear.
Here’s the path I followed and what each checkpoint protects:
- Lesser Magic Wand: Available from the AH or an Enchanter at level 5. Get this immediately. Without it, the kill sequence has no reliable finisher.
- Greater Magic Wand: Target this before level 15. Usually cheap on the AH and craftable by Enchanters. Skipping it creates a damage gap that costs Spirit Tap procs.
- Level 20–30: Check the AH every 8–10 levels. Any wand with higher DPS is worth the small gold cost at this stage. The Gravestone Scepter, earned through a quest chain that wraps up in Blackfathom Deeps, is worth the group finder queue if it lines up with your level.
- Level 30–40: Quest rewards start offering viable wands here. Take them when they appear. Don’t wait while the current one ages out.
- Level 40–50: Shadowform is active now, and wand swings hit harder. An outdated wand wastes the damage bonus you just unlocked.
- Level 50–60: Dungeon drops and AH options both improve. A current wand keeps the killing blow reliable through the final stretch. Woestave, a reward from the Sunken Temple quest chain, is one of the stronger options here if your group ends up running it.
Wands don’t drop consistently from quests or mobs. A small AH budget checked every few levels is the most reliable way to stay current.
Stat Priority and Why Spirit Wins?
Spirit is the single most important stat for the entire leveling window. When Spirit Tap procs, it grants bonus Spirit equal to 100% of your current Spirit. Higher base Spirit means a bigger proc every time.
I chased spell power on gear early in one run, thinking faster kills would follow. What actually happened was slower regen, more downtime, and a mana bar that never felt recovered.
Running the actual regen numbers instead of eyeballing them is what convinced me Spirit wins outright, not just marginally.
Here’s the priority order that held up across every level band:
- Spirit: Feeds passive regen and multiplies every Spirit Tap proc. Worth more than any other stat before level 40, and competitive well beyond it.
- Intellect: Increases mana pool size, useful for longer pull chains. It doesn’t directly affect regen rate. Spirit does more work per point at this stage.
- Stamina: Deprioritized for most servers. Power Word: Shield and healing spells cover survivability without needing Stamina on gear. Hardcore players should weigh it slightly higher.
Spell power is the trap stat for early leveling. The kill sequence minimizes cast count. Two or three spells per mob means spell power barely moves the needle. Spirit always does more.
Leveling Methods: Solo Questing vs. Dungeon Grinding

Solo questing is the faster and more consistent path for most players. Dungeons can beat it in specific level bands, but only with a reliable group and clean runs every time.
That second condition is the one most players don’t have.
Solo Questing
The kill sequence built across this guide is designed entirely around solo open-world leveling. Zone flexibility, no group coordination, and full control over your pull pace all add up across 60 levels.
I’ve leveled both ways, and the solo path wins out in consistency.
A good dungeon run beats solo questing per hour, but a bad one, with waiting for groups, wipes, and slow clears, falls well behind it.
Mind Flay and the full Shadow tree shine here. Every talent picked since level 20 feeds directly into this method, and nothing gets wasted.
Hardcore players are the exception. The safety of a reliable group often outweighs raw speed when a single bad pull permanently ends the character.
Dungeon Leveling
Dungeons invert almost everything the kill sequence is built around. In a group, you’re expected to heal. That means the Shadow framework gets set aside entirely.
Mana efficiency still matters, but now it means sustaining heals through a pull, not proccing Spirit Tap off a killing blow. I found the mental shift harder than the actual gameplay change.
Discipline investment becomes genuinely valuable here. The talents that felt wasted for solo leveling suddenly have a real job to do when your group depends on your throughput.
The hybrid path I’d recommend is to level Shadow to 40, get Shadowform, then decide. Shadowform’s armor reduction makes the transition into healing content slightly less punishing on survivability.
Leveling on a Hardcore Server: What Changes
Hardcore doesn’t require a different build. It requires more respect for the one you already have. The Shadow kill sequence is actually more valuable here because clean, fast kills mean less time taking damage per mob.
The adjustments are marginal. The mindset shift is bigger than the stat changes.
Here’s what I’d change coming into Hardcore specifically:
- Stamina priority increases: Survivability matters more when death is permanent. It doesn’t overtake Spirit, but it stops being something you completely ignore on gear.
- Power Word- Shield every pull: The sequence already opens with it, but on Hardcore, the reason changes. It becomes a survival buffer for when something goes wrong mid-fight, on top of its usual job of stopping pushback.
- Never pull multiple mobs: One mob at a time, every time. I’ve watched players lose Hardcore characters to a single wandering add that arrived at the wrong moment.
- Wand-finishing is non-negotiable: Taking damage to land one extra cast at the end of a pull is a bad trade on Hardcore. Let the wand close it. That’s what it’s there for.
- Be conservative with dungeon entry: Don’t enter a dungeon the moment you hit the level requirement. A few extra levels of buffer make a real difference when you can’t release and run back.
These layers are on top of the standard guide. Nothing here replaces the kill sequence or the talent path. They just tighten the margins around it.
The one trap I’ve seen on Hardcore is overcorrecting on Stamina.
Stack too much of it and your mana efficiency drops, kills get slower, and you actually spend more time in combat per pull. Longer fights on Hardcore are more dangerous, not safer.
Common Mistakes That Slow Priest Leveling And How to Fix Them
Running out of mana on a Priest feels like a skill problem. It took me too long to realize it almost always traces back to one of these five things.
They stack on each other, too. Fix one, and the next one gets easier to spot. Here are the five mistakes I made, and what each one actually costs you:
- Skipping wand upgrades: I ran an eight-level-old wand through an entire zone without noticing. Spirit Tap stopped processing cleanly, and downtime crept back in pull by pull.
- Casting too many spells per mob: Every extra cast spends mana the wand would have covered for free. No clean killing blow means no Spirit Tap proc, and you’re sitting down to recover mana you didn’t need to spend.
- Stacking Stamina over Spirit: I didn’t notice this one until I swapped a few pieces and watched recovery time between pulls drop immediately. Stamina doesn’t feed Spirit Tap’s proc value. Spirit does.
- Investing in Holy for solo leveling: My mistake around level 14. Kills slowed, downtime grew, and nothing closed the gap. Those points simply don’t contribute anything to the solo kill sequence.
- Casting Mind Blast twice per mob: Felt productive in the moment. Shadow Word: Pain was already ticking and the wand was already finishing. The second cast was pure mana waste every single time.
Start with the wand if more than one of these sounds familiar. That single fix clears most of the cascade before it reaches everything else.
Conclusion
Priest leveling made sense to me the moment I stopped trying to kill faster and started protecting my mana bar instead. That one shift changed every decision after it.
The kill sequence, the wand ladder, and the talent path aren’t separate systems. They feed the same engine, and once that clicks, the run gets significantly smoother.
Now you know where each decision comes from and why it holds up across every level band. Nothing here is guesswork. It’s what actually worked across multiple runs.
Pick your race, lock the talent path, and keep the wand current. Everything else follows naturally from there.
If you’re running a different race or build and it’s working for you, drop the details in the comments. I’m always curious what other Priests have found.
Frequently Asked Questions
What is the Best Spec for Leveling a Priest in WoW Classic?
Shadow is the best spec for solo leveling. Run Discipline through level 19 for Spirit Tap and Wand Specialization, then move into Shadow and stay there until Shadowform at 40.
Are Priests Hard to Level in WoW Classic?
Not hard, but unforgiving of system mistakes. Upgrade your wand regularly, finish mobs with it to proc Spirit Tap, and prioritize Spirit on gear. Downtime almost disappears when those three habits are consistent.
Should I Level as Shadow or Holy in WoW Classic?
Shadow is significantly faster for solo leveling. Holy only earns its value in group dungeon content. Every point spent there before level 40 delays Shadowform and noticeably slows your overall pace.
What Wand Should I Use While Leveling a Priest in WoW Classic?
Start with a Lesser Magic Wand at level 5, upgrade to a Greater Magic Wand before level 15, then check the AH every 8–10 levels. An outdated wand breaks the kill sequence faster than any other gear gap.